Hey everyone, it’s Sam from your go-to wood beam supplier, and let’s cut to the chase: there’s nothing worse than a top-quality wood beam going to waste because water ruined it. I’ve been in this game for over 12 years, and I’ve seen everything from brand-new beams for a backyard deck warping like a potato chip to structural beams in a barn developing so much rot they had to be replaced before the first winter freeze. If you’re here because you’ve got beams that are either already suffering water damage or you want to make sure yours never will, this guide’s for you. No fancy jargon, no overcomplicated steps—just real talk from someone who’s delivered thousands of beams and helped customers seal them right. Wood Beam

First, let’s get one thing straight: wood is porous. It’s like a sponge, just waiting to soak up every drop of rain, snow, or even condensation from a damp basement. That’s why sealing isn’t just a “nice to have”—it’s non-negotiable if your beam’s going to hold up long-term, whether it’s outdoors (deck beams, pergola supports, barn framing) or indoors (basement load-bearing beams, exposed ceiling beams in a finished space). The good news? You don’t need a crew of contractors or a bunch of expensive tools. The bad news? Not all sealants are created equal, and skipping a step or grabbing the wrong stuff can make your whole effort useless. Let’s break this down step by step, starting with the prep work that most people sleep on.
Here’s the thing: if you slap a sealant on a dirty, damp, or rough beam, you’re basically just painting gunk on a surface that doesn’t want to stick. Prep is 80% of the job, I swear. Let’s start with the surface itself. First, if your beam’s brand new, straight from our warehouse? Give it at least 48 hours to acclimate to its space—outdoors, that means setting it in the spot it’s going to live, not in your garage where it might get warmer/colder than the final location. Indoors, let it sit in the room it’ll be in for 24 hours. Wood moves, and if you seal it too soon after moving it, it’ll shift, crack, and the seal will break too. That’s a rookie mistake I see all the time.
Next, cleaning. If you’re dealing with a used beam (say, salvaging an old barn beam for a new accent wall), or even a new one that’s sat around your job site for a week, you’ve got dust, sawdust, pollen, maybe even a little mildew if it’s been rained on. For that, a stiff bristle brush (like a deck scrub brush) and a mild, wood-safe cleaner—nothing with harsh bleach, that can eat at the wood’s natural fibers over time. Scrub every inch, especially the cracks and grooves, because that’s where water loves to hide. If there’s mildew, mix a gallon of water with a cup of white vinegar and a tablespoon of baking soda, spray it on, let it sit 15 minutes, then scrub. Rinse it off with a garden hose (or a wet rag for indoor beams) and let it dry completely. Wait, I can’t stress that enough—completely dry. How do you know? Stick a moisture meter in it. If the reading’s over 15% (for outdoor use) or 12% (indoor), it’s not ready. Sealant won’t stick, and any moisture trapped under it will just cause rot from the inside out. I learned that the hard way early on—delivered a bunch of beams to a job site that was still being framed, the crew sealed them before the drywall was up, and a month later, the basement beams were moldy. Total waste, and the crew had to pay to redo it. Don’t do that.
Also, fill in any cracks or gaps before you seal. Small cracks under an inch wide? Use an exterior wood filler that’s tinted to match your beam. Larger ones? For structural beams, use an epoxy filler, not the cheap stuff. For accent beams, even a good wood putty works. The goal is a smooth surface so the seal doesn’t have to work overtime on uneven spots. And if you’re sealing the ends of the beam? That’s the most vulnerable part. Ends soak up water 10x faster than the flat sides, so don’t skip that step. Tape off any areas you don’t want to get sealant on—like metal fasteners, windows, or other building materials. Painter’s tape works fine, just make sure it’s rated for the weather if you’re working outdoors.
Now, the fun part: picking the right sealant. This is where most people go wrong, and it’s not because they pick a bad product—it’s because they pick the wrong one for their beam’s location. Let’s break down the main types, and when to use each, based on what I’ve seen work (and what’s failed miserably).
First up: Polyurethane. This is the OG, and it’s great for indoor beams, or outdoor beams that are sheltered (like a pergola that’s under a roof, or a deck beam that’s only getting splashed, not direct rain). It’s durable, doesn’t yellow too much (especially the water-based versions), and gives a nice, slightly glossy finish that lets the wood’s grain show. Wait, but not all polyurethane is the same. Oil-based is more durable, but it takes longer to dry (12-24 hours per coat) and has that strong odor. Water-based is low-odor, dries in 2-4 hours, and is easier to clean up with soap and water—perfect if you’re working in a tight space indoors. I recommend water-based polyurethane for most residential jobs, unless you’re dealing with a beam that’s going to get a lot of heavy wear, like a beam near a patio table that people might bump. Pro tip: apply 3 thin coats, not 1 thick one. Thick coats will drip, and they’ll peel way faster. Sand lightly with 220-grit sandpaper between coats to get a smooth finish, wipe off all the dust before the next coat. That’s key.
Next, for outdoor beams that are exposed to direct rain, snow, and sun? You need something tougher. Oil-based exterior varnish is an option, but my top pick here is penetrating epoxy sealer. Wait, what’s that? It’s not like polyurethane that sits on top of the wood—it soaks deep into the pores, sealing it from the inside out. That makes it way better for beams that are going to be constantly exposed to moisture. It also fills tiny micro-cracks that you can’t see, so no water can get in there even if the wood shifts. The only downside? It’s a two-part product, so you have to mix it, and it’s more expensive. But trust me, it’s worth it. I had a customer last year who used a cheap varnish on his barn beams, and after one winter, half the seal peeled off. He stripped it, used penetrating epoxy, and two years later, it’s still perfect. For really harsh areas—like beams near a pool, or that get direct sun all day—add a UV-resistant top coat over the epoxy. That stops the sun from fading the wood and breaking down the seal.
Wait, another big one: exterior wood stain with a sealer built in. A lot of people mix up stain and sealant, but stain adds color, and a good semi-transparent stain has a built-in sealer that protects against water. This is great if you want to keep the natural wood look, or just add a subtle tint without a glossy finish. Solid stain is more like paint, it hides the grain, but it’s also more durable for high-exposure areas. The catch with stain-and-seal is that you have to reapply it every 2-3 years, whereas polyurethane or epoxy can last 5-7 years, depending on conditions. That’s a good thing to keep in mind for maintenance.
And what should you avoid? Skip the cheap “all-purpose” sealant you grab at the hardware store impulse bin. I’ve seen people use silicone caulk as a sealant—don’t do that. Silicone is flexible when it dries, so it will crack as the wood moves, and it traps moisture under it, leading to rot. Same goes for latex paint on exterior beams—paint will peel, and water gets under it. Save paint for walls, not wood beams.
Okay, now the application part. You’ve prepped the beam, you’ve got your sealant, now let’s do it right. First, work in the right conditions. If you’re working outdoors, pick a day that’s not too hot (above 90°F will make most sealants dry too fast, leading to streaks) and not going to rain for at least 24 hours. Indoors, open a window or use a fan for ventilation, especially if you’re using oil-based products. Never apply sealant in direct sun—heat will cause it to bubble or stick unevenly.
Tools: you can use a high-quality natural bristle brush (for oil-based) or synthetic brush (for water-based). A roller works too for flat sides, but you’ll still need a brush to get into the cracks and edges. Avoid cheap brushes, they leave loose bristles all over the beam. And don’t forget a rag for drips.
Start with the ends first, remember? They’re the most porous. Brush sealant on all four edges of the end grain, let it soak in for 10 minutes, then add another coat. Do that twice, and that’s the end part done. Now work your way down the length of the beam, working with the grain, not against it. That’s another common mistake—brushing across the grain leaves streaks and makes the seal less effective. Apply thin, even coats, no globs. For the first coat, you want it to soak in, so don’t overload the brush. Let each coat dry completely before adding the next. Check the can for exact times—water-based is usually 2-4 hours, oil-based is 12-24, epoxy might be 24 hours between coats. Don’t rush this. If you add a second coat too soon, it will not adhere, and you’ll have to sand it all off and start over.
Wait, what about the underside of the beam? A lot of people forget that, but that’s where condensation builds up, especially for beams in basements or under decks. Make sure you get the underside too, not just the top and sides. Even a light coat there will make a huge difference.
Once you’re done, wait the full cure time before putting anything heavy on the beam, or exposing it to heavy moisture. Polyurethane takes about 7 days to fully cure, not just dry, so no dragging furniture across it or hosing it down for a week. That’s another thing I’ve seen—people think it’s dry after 4 hours, so they move the beam, and the seal smudges. Don’t do it.
Now, maintenance. Sealing isn’t a one-and-done job, especially for outdoor beams. Once a year, do a quick inspection: check for peeling, cracking, or discoloration on the seal. If you see any spots, sand them lightly, clean the area, and re-seal just that spot. Every 3-5 years, depending on the sealant you used, do a full reapplication. It’s way easier than fixing rot, I promise.
Let me circle back to my role here. I supply wood beams, and I’ve seen first-hand that even the best beam in the world won’t last if it’s not sealed right. If you’re picking out beams for your next project, don’t hesitate to ask me for recommendations on the best type of wood (some woods, like cedar or redwood, are naturally more resistant to rot and moisture, but they still need sealing) or the best sealant for your specific project. I’ve worked with deck builders, renovators, and homeowners, so I know what works for every scenario.
If you’re ready to grab beams for your project, or you have questions about sealing specific types of beams, hit me up to chat procurement. We’ve got a huge selection of kiln-dried beams, all prepped and ready for whatever job you’ve got, and we can help you figure out the right sealant and steps for your space. No pushy sales talk, just real advice from someone who’s in the wood beam business every single day.
Before I go, let me leave you with a quick recap to make sure you don’t forget anything: 1) Prep is key—clean, dry, and fill cracks before sealing. 2) Pick the right sealant for your location: polyurethane for indoor/sheltered outdoor, penetrating epoxy for exposed outdoor. 3) Apply thin coats, work with the grain, don’t rush drying time. 4) Maintain it regularly to keep your beams going for decades.
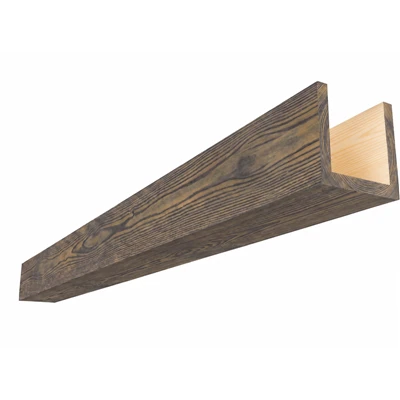
That’s all for today. If you have any questions, don’t be shy to reach out.
Shou Sugi Ban References:
- Forest Products Laboratory. (2010). Wood Handbook: Wood as an Engineering Material. U.S. Department of Agriculture.
- American Wood Protection Association. (2018). AWPA Standard for Wood Preservation Treatments. American Wood Protection Association.
- Karabinis, A., & Passialis, C. (2015). The effect of sealants on the moisture performance of wood structures. Construction and Building Materials, 95, 682-690.
Dongguan Mumu WoodWork Co., Ltd.
As one of the most professional wood beam manufacturers and suppliers in China, we also support customized service. Please feel free to wholesale bulk high quality wood beam for sale here from our factory. Good service and low price are available.
Address: Room No.2602-2603, Unit 9B, Universal Commerce Center, Nancheng District, Dongguan City, Guangdong Province, China,523073
E-mail: sales@mumu-ing.com
WebSite: https://www.mumuthermowood.com/
